Struggle:
Where would we be without it? A successive, or a big one, anyhow you think
about it, brings out the best in you or your character. They make you
appreciate the feeling of achievement. The more intense the struggle in
question the more you appreciate your achievement. Think about a time when you had to overcome
some challenge you thought or perceived as insurmountable when you got to the
“end” how did you feel? Think about how we appreciate a protagonist in a
struggle that seems insurmountable, a la Mandela, Obama, Abraham Lincoln, The Batman, Superman and ..em..hopefully
..me.. after you...eh... read my entire story that is..wink, wink..heh! heh!
If you
are Nigerian by birth like me, and grew up in my time, starting from the late
the seventies (I’m never going to give
you my age..LOL) in Nigeria, then
you’ll understand that it is likely that your parents had never heard of
animation before you told them about it and the irony is that they bought you animated
cartoons as a child. Even though I loved it to a certain degree, I had to get a degree (pun intended) in study Chemical/Polymer
Engineering to appease my parents and the society at large because very few
professions are regarded as respectable in Nigeria. By the time I got to my
third year in the university, I became very disenchanted with school because
Nigerian schools and Nigerians put too much emphasis on passing exams, and not
learning, and I wanted to learn. I wanted to be awoken in the middle of the
night and asked for a solution for a plant pipe problem (maybe a corrosive one) and instantly give the answer then go back
to sleep..(Bad guy!..na only me dem born?).
Well that did not happen and I was not fulfilled with just having a kpali (that is how we refer to school certificates in Nigeria, no wonder we
are so aggressive as a people imagine the emotional intensity required to
pronounce k and p in a word.) with a second class... (I do want to blow my trumpet or wash my dirty linen in public here...),
so at the end of my schooling I turned to my calling: Animation
First I
had to deal with my own personal challenges (doubt and limiting beliefs), then
I had to deal with the fact that we had no animation schools in Nigeria and we
still do not have any animation school here, I also had to deal with my parent’s
disapproval of animation as something to do for a living. I also have no
artistic skills at all. I also had to
deal with my friends already doing “better” (marriage,
car, renting a house, good paying jobs) than I was doing. Even while learning the animation I had find a
way to commercialize the skill because my parents were getting exceedingly
frustrated with my seemingly lukewarm attitude (please note the word seemingly) towards life and I can’t blame
them at all because viewing it in retrospect that is exactly how that it
looked. I have found a way to commercialize and make a good living but I’m not,
in anyway, content with that. I’d like to make a statement, a resounding one
for that matter. Trust me, that is a
very tough thing to do with animation in Nigeria but that is a challenge I have to rise against and I’m loving
every bit of it. I have learnt to thrive on these sort of challenges.
 |
| Add caption |
to be known for creating very compelling motion pictures: Animated and Live action.
Some goals
are easy and others are not. I say easy or not, depending on the visibility and
clarity of the goal to the protagonist in question.
Goals set for us are most times easy: Parents (go to
school, get good grades and get a good job), Peers (what to wear, the kind of
people to date, have sex early or not), Society (rules, norms and
customs). But the ones we have to set
for ourselves, especially if they require taking us from the known to the unknown,
are most times very difficult most times it is our responsibility to make them
crystal so that we can see where we are going and then fashion out ways to get
there, if you are a leader it will be your responsibility to make it clear to
your followers and yourself. Most people
run away from setting goals for themselves, because they are afraid, they
rather hand it to someone to do that for them.
Every
profession has its planning method to get from point A (where you are) to point B (where
you want to be). In Animation we use timing,
extremes, keys and breakdowns to
take us to our destination (which is to
create compelling and convincing movement to satisfy the audience).
Here is what I mean, suppose you want to animate a
step that is a character taking a step, I really prefer to use the word “build
” as in build a step ( I’ll tell you why later). First we establish the timing (PAL:24 frames per second): a
regular walking step means that the character will take a step or make contact
with the ground every half a second. Since we are animating it is by far better
to say every twelve frames (12). The
next thing to do is to establish the extremes and the breakdowns. For this simple animation,
these will serve as the goals. Then
we go ahead to determine the other key
positions, the in-between and
then the spacing. I will explain the
mechanics (don’t forget I’m an engineer..a
chemical one for that matter) of a
walk later and we will even get into building a walk cycle. For now I want you
to understand how timing, extremes, and breakdowns and keys give animating more
sense.
Even if you do not understand just keep moving forward as long as you are in “motion”, you’ll understand eventually (I encourage you to approach life in this manner as well)
Even if you do not understand just keep moving forward as long as you are in “motion”, you’ll understand eventually (I encourage you to approach life in this manner as well)
Oh! I’ll be using Anime studio Pro to solve this, and all
the other, animation solutions but please understand that the principle is the
same as classical animation. As a matter of fact this is classical animation
done with Anime Studio Pro (Bad isn’t it). I’ll be working under
the impression that you know the basics of Anime
Studio Pro. If you do not....well
we’ll have to find a way to make you understand it won’t we?
Once you are in the Anime studio pro environment create a
stick man just as I have and then rig him (put bones in him). Colour his right
limbs (legs and arms) red and left
limbs green or use colours of your choice. Just make sure you can differentiate
his right from his left. Err.. no need to go through the trouble of doing that
here is the file.
For some funny reason this is the video (and song) i’m currently watching at the time of writing this blog. Nice song isn’t it. The girl in the video is hot or what do you think? Her name is Dhany (short for Daniella) and she actually lives next door, as a matter of fact she inspired this blog cause i "struggled" real hard to meet her. Anyway...
For some funny reason this is the video (and song) i’m currently watching at the time of writing this blog. Nice song isn’t it. The girl in the video is hot or what do you think? Her name is Dhany (short for Daniella) and she actually lives next door, as a matter of fact she inspired this blog cause i "struggled" real hard to meet her. Anyway...
...LET THE BUILDING
PROCESS BEGIN......
STEP 1
Press control
(CTRL) + K, to bring out the action
windows.

STEP 2
Click on
the new action button as indicated
above. This will bring out a dialogue box labelled Action name. Rename the Action
1 to Extreme 1.

Your
Action Window should look like this
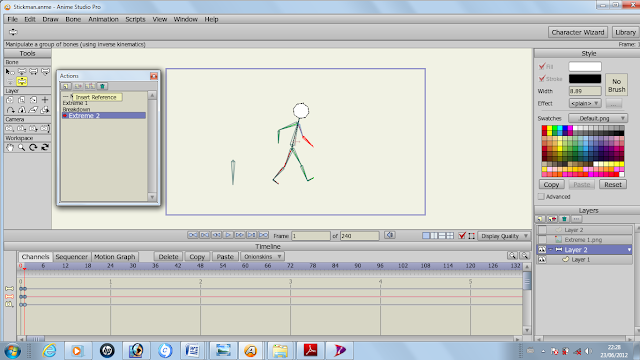
(above). Double click on the newly created action (Extreme 1).

There
should be a colour change in your timeline......
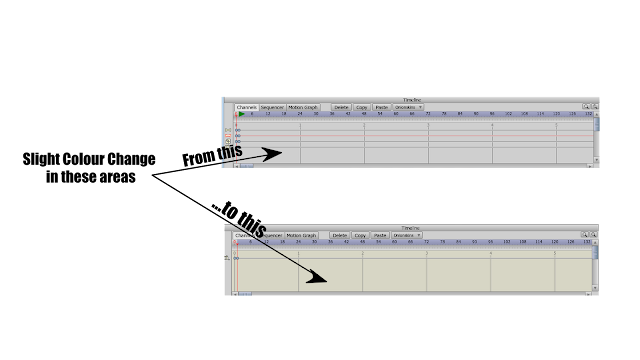
The top is the Mainline timeline, while the one below is the Action Window timeline.
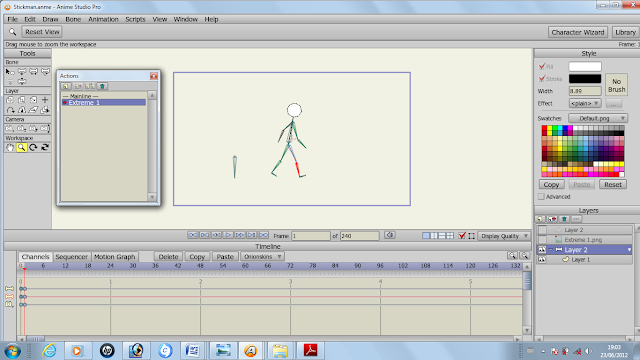
STEP 3
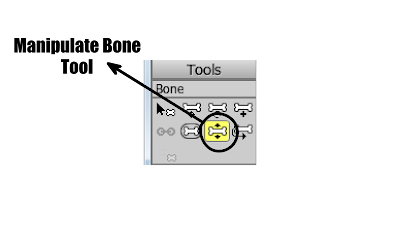
While in the Action timeline (Extreme 1) with the manipulate bone tool......
.....pose your character .....
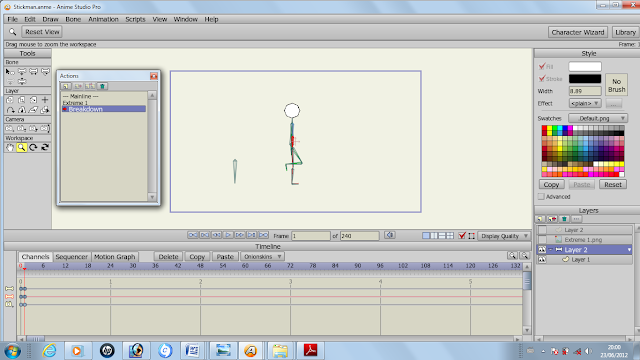
STEP 4
In the Actions window, click on the mainline. Then repeat steps 1 and 2, but this time, name your new action Breakdown. Then with the manipulate bone tool (Z), pose your stickman character like this (Below)
STEP 5
In the Actions window, click on the mainline.
Then repeat steps 1 and 2,
but this time, name your new action Extreme 2. Then with the manipulate
bone tool (Z) pose your stickman character like this (Below)
Do the opposite of what you did in Extreme 1 that is Green leg in front,
and red leg at the back, green hand at the back and red hand in front.
STEP 6
Double click on the mainline in the Action
window and move from frame 0
to frame 1. Go to your action window and click
once on extreme 1. On the actions
window there is a button called the insert
reference button. Kindly avoid the insert copy button for
now (I’ll explain later).
When you
do this an arrow like keyframe
should appear on your mainline timeline just like below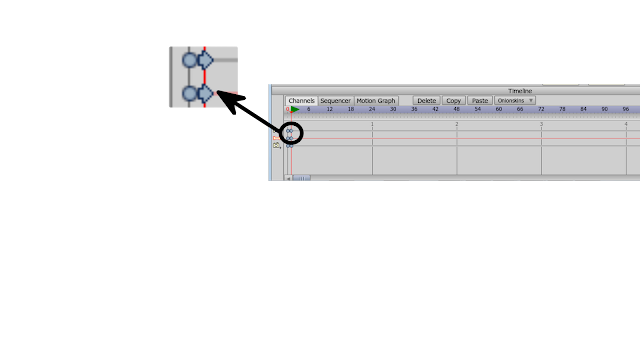
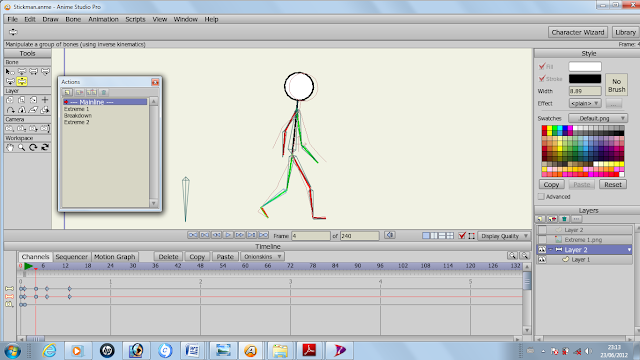
Since we are animating a regular walk, the breakdown position should be on frame 7 and the extreme 2 should be on frame 13. Simply repeat I did on frame 1 to establish those keyframes (breakdown and extreme 2) on frames 7 and 13 respectively. So your timeline should look something exactly like this.
You have succeeded in animating 80% of the walk. Why? You may ask, well like I said early once you know where you are going your struggle will make a lot of sense. Now you have established the extreme and breakdown position already. If you scrub through the timeline you’ll see that your stick character is taking a step already. Now you will have to put in the up and the down, to give walk(or the step) more character. These keyframes should be on frames 4 and frame 10 respectively.
Now that
you have done a good job establishing the goals (timing, extremes and the breakdowns) let’s do the struggle (spacing, other key positions and the
in-betweens). I personally consider
these a struggle because they require some trial and error to get satisfactory
results but you’ll get a lot better (meaning less trials and errors) as you
animate more. You may skip the spacing for now as I’ll explain better to you
when the focus is to learn how to build a walk cycle.
The other key positions are the Down and the Up.
STEP 7
To
establish the down, make sure you
are on the mainline timeline then
simply move the slider to frame 4 and
pose, with the manipulation bone tool
(Z), the stickman to look like mine below. You may employ the help of the onion
skin just like I did.
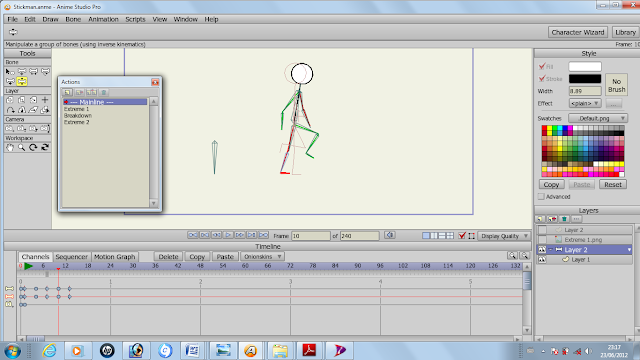
STEP 8
To
establish the up, make sure you are
on the mainline timeline then simply
move the slider to frame 10 and pose
the stickman to look like this. Again, you may employ the help of the onion
skin just like I did.
What you have also succeeded in doing is creating an animation where you can easily differentiate which keyframes hold the extremes (Keyframes 1 and 13), the breakdown position (keyframe 7), the down (keyframe4) and the up (keyframe7). You must develop the habit of doing this (Differentiating your keyframes from your in-betweens) because it will make your animation more convenient for YOU.
WHAT ABOUT THE IN-BETWEENS THEN?
No problem we’ll take care of
that but a quick explanation before we do that. In hand drawn animation after
the key animator has drawn the extremes and breakdown and other key
positions, another artists usually called the in-between animator then comes in to draw the in-betweens (KAI! A lot of people to pay now).
If your default interpolation is on smooth,
then Anime studio PRO has inserted
the in-betweens for you already
(YAY!). The in-betweens are at frames
2,3,5,6,8,9,11 and 12.
It doesn’t really matter who puts in the
in-betweens as long as you understand where they are supposed to be.
Now, If you play the animation
you’ll see that the character has taken a step but has not actually moved
forward.
He is actually kinda... Moonwalking...but on the same spot but MJ is still the king of moonwalks no matter how good my animation is.
He is actually kinda... Moonwalking...but on the same spot but MJ is still the king of moonwalks no matter how good my animation is.

I’m a huge fan of Michael Jackson...heee! heee!)
LET’S MAKE HIM MOVE THEN
STEP 9
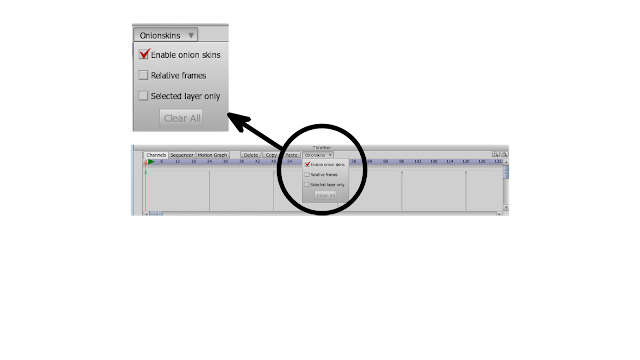
Activate the onion skin, you will
find it very helpful here. Click on the
Onionskin button on the timeline and a drop list will come down with 3 check
boxes. Click on the check box that has beside it “enable onion skins”.
Scrub the slider to frame 4 (the down) and then click on frame one. You should have something like this, below (a dark patch) on your timeline.

After you do that click on the translate bone tool in the toolbar or if you are on the bone layer just press T on your keyboard to activate the translate bone function.
Using the onionskin as a guide,
move the root bone and pose the stickman as I have done below. Watch the feet
now make sure they are properly aligned just like in the picture below.


Scrub the slide to frame 7, and use frame 4 as the onion skin. Once that happens, you will see the
onion skin of frame 4 Scrub the
Slide to frame 10 and use frame 7 as the onion skin. Then align properly
Scrub the slide to frame 13 and use frame 10 as the onion skin
then is align properly.
If well done you should this kind of result.
Every good animation is planned
this way. You must always start with the
timing: put a time frame on your dreams so that you turn them into goals
otherwise they are just dreams, then go for the extremes (very important as you
must always know where you are going even before you get there) then
determine the breakdowns ( I also believe in setting sub goals on the
way to your big goals). Then you will have to determine other key positions (more sub goals) if there any other. Then come the in-betweens (if there are any) and the spacing
(these I’ll explain better in due course).


